

Escalate to a custom chat provider automatically
These steps cause a widget to escalate to a custom chat provider when the widget is loaded.
About this task: This procedure causes a floating widget (nanorep.floatingWidget) to escalate the customer interaction to a custom chat provider when the widget is loaded. This escalation occurs without prior customer interaction.
Steps:
 |
If you have already implemented a custom chat provider, skip to Step 8 to cause the widget to escalate to that chat provider when the widget loads. |
-
Create a channeling
policy like the following in the Bold360 AI Console.
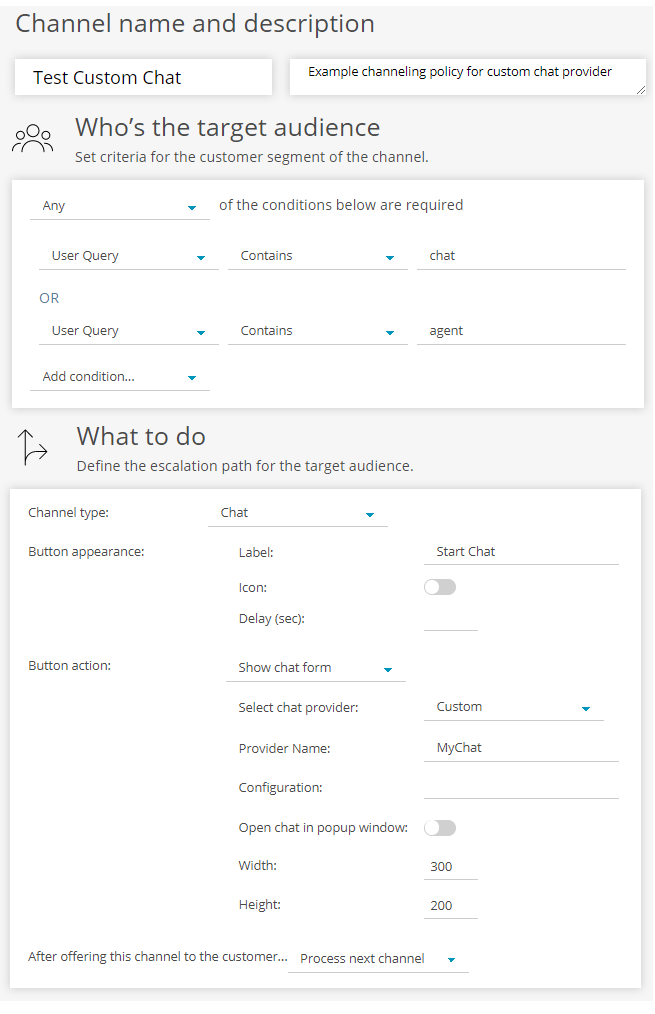
This channel policy is triggered when the customer types text that includes "chat" or "agent". In response to that input, it triggers the custom chat provider you will create in Step 4 below.
- Use an editor to open an HTML page that contains a floating widget.
-
Test the HTML file in a browser.
Notice that if you type chat or agent, the widget doesn't reply with a "Sorry, could not understand that" message, because those are the triggers defined above for the channeling policy you created (but that is not yet implemented).

-
Add a custom chat provider to your web page as follows:
- Go to the Custom Chat Provider reference documentation, select the "seamless chat UI" link in the Demos column, and copy the entire addChatProvider function from the "Seamless chat UI with fake agent" example. Don't copy the ChannelingBar part of the example.
-
Paste the code into your HTML file just below the line that calls the
setKB method.
That is, paste within the init function. The beginning of the nanorep.floatingWidget.on function should then look like this:
nanorep.floatingWidget.on({
	init: function() {
		this.setKB('1234567890');

		nanorep.sdk.addChatProvider('TestSeamlessUI', {
		  getCapabilities: function() {
-
Modify methods in the code you pasted as follows.
Method Make these changes addChatProvider 1. Change nanorep.sdk.addChatProvider to this.addChatProvider. It's easier to use "this" to reference the widget within its event code. 2. Change the name of the chat provider from TestSeamlessUI to the Provider Name you used when you created the channeling policy in the Bold360 AI Console.
showVendorUI Add a comma after the endChat function. Then add the following method at the end of the list of init methods: showVendorUI: function() { alert('activating chat in current page...'); }You can make additional changes if you like; see Add a custom chat provider.
- Refresh the web page in the browser, and type RESET in the widget to cause it to reflect your latest changes.
-
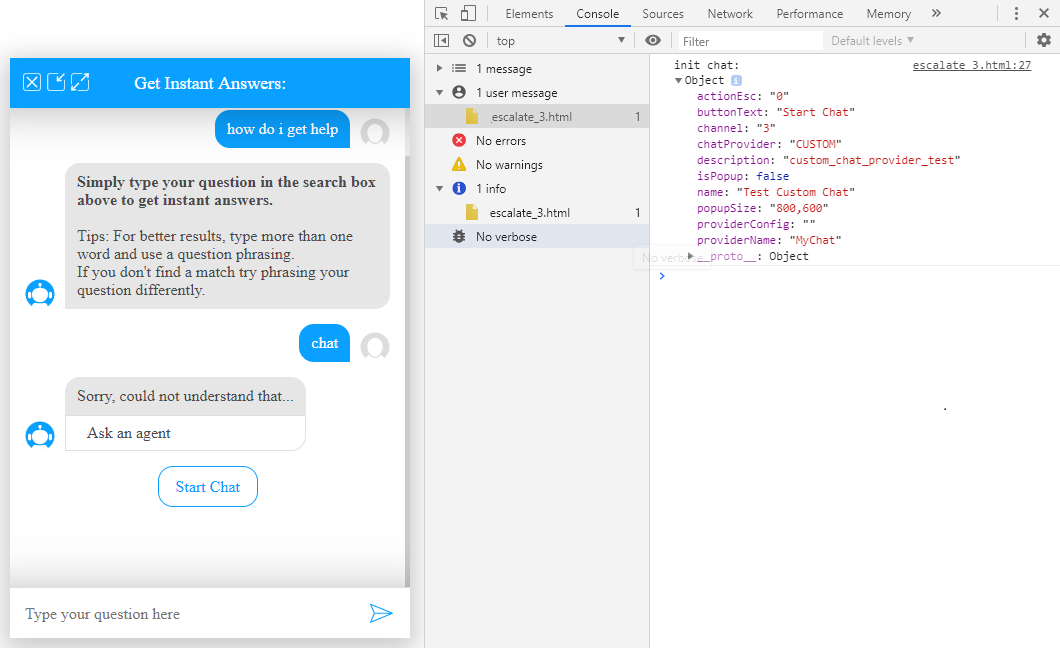
Type chat in the widget, and click the Start Chat
button.
When you type chat, that widget displays a Start Chat button. After your start the chat, you should see the Hello message from the requestChat method. Then, whenever you type something, you see the agent reply message from the sendMessage method.
-
Now, add the following code to the end of the script
in your HTML file. This function causes the widget to escalate to the chat
provider when the widget loads without customer interaction to trigger the
escalation.
nanorep.floatingWidget.on('load', function() { alert('escalating to custom chat'); this.escalate(channel); });If you test the page at this point, the Developer Tools pane reports an error that says channel is not defined.
-
To correct the error, add a
channel object to your script. Use the following example,
but change the providerName to match the channeling policy you
created in the Bold360 AI Console.
const channel = { actionEsc: '0', buttonText: 'Start Chat!', channel: '3', chatProvider: 'CUSTOM', description: 'MyChat', isPopup: false, name: 'Test Custom Chat', popupSize: '800,600', providerConfig: '', providerName: 'MyChat', }; - Now you can test the page and see that the chat starts automatically when you refresh the page.
<!DOCTYPE html>
<html lang="en">
<head>
<meta http-equiv="content-type" content="text/html; charset=UTF-8">
<title>My Chatbot</title>
</head>
<body>
<!-- nanorep floating widget -->
<script>!function(t,e,o,c,n,a){var s=window.nanorep=window.nanorep||{};s=s[e]=s[e]||{},s.apiHost=a,s.host=n,s.path=c,s.account=t,s.protocol="https:"===location.protocol?"https:":"http:",s.on=s.on||function(){s._calls=s._calls||[],s._calls.push([].slice.call(arguments))};var p=s.protocol+"//"+n+c+o+"?account="+t,l=document.createElement("script");l.async=l.defer=!0,l.setAttribute("src",p),document.getElementsByTagName("head")[0].appendChild(l)}("account_name","floatingWidget","floating-widget.js","/web/","account_name.nanorep.co");</script>
<script>
nanorep.floatingWidget.on({
init: function() {
this.setKB('1234567890');
this.addChatProvider('MyChat', {
getCapabilities: function() {
return {
customUI: true, // indicates that provider support seamless chat integration
vendorUI: false, // indicates that provider supports nativeUI within the page
vendorPopup: false // indicates that provider can open chat in a new window
}
},
constructor: function(channel) {
// a place to initialize chat provider instance (executed only once)
console.log('init chat:', channel);
},
isAvailable: function(callback) {
// this method is used to report availability
// just execute callback with truthy value to indicate that chat is available
callback(true);
},
requestChat: function() {
// this method is executed when widget is requesting chat with agent
var self = this;
setTimeout(function() {
// simulate delay to show "waiting for agent..." state
self.emit('chatStarted');
// simulate initial incoming message from agent
self.emit('newMessage', { text: 'Hello world! Type something to get a reply!' });
}, 1000);
},
setVisitorTyping: function(isTyping) {
// this method is executed when visitor starts/stops typing (isTyping is boolean value)
},
getAgentName: function(callback) {
// this method might be executed by widget to retrieve agent name
callback('Chris');
},
sendMessage: function(message) {
// this method is executed by widget when user submits the text (message argument is plain object with "text" property containing user input)
var self = this;
self.emit('agentTyping', true);
setTimeout(function() {
// simulate agent typing activity and show agent reply message by emitting "newMessage" event
self.emit('agentTyping', false);
self.emit('newMessage', { text: 'AGENT REPLY FOR: ' + message.text });
}, 1000);
},
endChat: function() {
// this method is executed by widget when user wants to stop chat with agent
this.emit('chatEnded'); // provider decides when chat is really terminated (additional confirmation dialogs or post-chat surveys might be shown)
},
showVendorUI: function() {
    alert('activating chat in current page...');
}
});
}
});
nanorep.floatingWidget.on('load', function() {
    alert('escalating to custom chat');
    this.escalate(channel);
});
const channel = {
    actionEsc: '0',
    buttonText: 'Start Chat!',
    channel: '3',
    chatProvider: 'CUSTOM',
    description: 'MyChat',
    isPopup: false,
    name: 'Test Custom Chat',
    popupSize: '800,600',
    providerConfig: '',
    providerName: 'MyChat',
};
</script>
<!-- //nanorep floating widget -->
</body>
</html>