Add a custom chat provider
Follow these steps to add a custom chat provider to a web page.
About this task: This procedure shows ways to customize a channeling policy using the Bold360 AI Web API. This is a prerequisite for several escalation procedures that integrate other services with Bold360 AI widgets. This topic describes widget methods for which you may want to write custom code.
Steps:
- Go to the Custom Chat Provider reference documentation, select the "seamless chat UI" link in the Demos column, and copy the entire addChatProvider function from the "Seamless chat UI with fake agent" example. Don't copy the ChannelingBar part of the example.
-
Paste the code into your HTML file just below the line that calls the
setKB method.
That is, paste within the init function. The beginning of the nanorep.floatingWidget.on function should then look like this:
nanorep.floatingWidget.on({ init: function() { this.setKB('1234567890'); nanorep.sdk.addChatProvider('TestSeamlessUI', { getCapabilities: function() { -
Modify methods in the code you pasted as needed. For example, you can make
changes like the following:
Method Suggested changes addChatProvider 1. Change nanorep.sdk.addChatProvider to this.addChatProvider. It's usually easier to use "this" to reference the widget within its own event code. 2. Change the name of the chat provider from TestSeamlessUI to the Provider Name you used when you created the channeling policy in the Bold360 AI Console.
getCapabilities Notice that customUI is set to true for this example. This means the chat provider you create will integrate seamlessly with the chat widget. If you were connecting to a chat provider that would use its native UI within the widget or would pop up a new window, you would enable other capabilities. constructor For debugging purposes, you can add a statement like the following within the constructor method:
A finished application probably wouldn't include this statement, but during development you can see the message in your browser's Developer Tools.console.log('init chat:', channel);isAvailable This method returns true to indicate that the chat provider is always available. Other implementations might call a function in the API of the provider being integrated. Or, a timeout might be added here. requestChat The line that emits a chatStarted event causes the widget to say, "Please wait for an agent" when you click the Start Chat button and then "Chatting with John Doe" when the simulated agent message is sent. Try modifying the "Hello there!" message the chat provider sends or the timeout before it is sent. You'll see this message when the custom chat provider loads.
setVisitorTyping The function for this method is executed when a customer starts or stops typing. You don't need to add anything here. getAgentName The name provided here is used in the title bar of the widget. Try changing the agent name to your name. sendMessage If you want to experiment with customizing the messages sent by the simulated chat agent, modify the code for this method. endChat You don't need to make changes to this method. If you added any functionality that needs to be disabled when the chat ends, this is where you would perform cleanup actions.
showVendorUI Add a comma after the endChat function. Then add the following method at the end of the list of init methods: showVendorUI: function() { alert('activating chat in current page...'); } - Refresh the HTML file in the browser, and type RESET in the widget to cause it to reflect your latest changes.
-
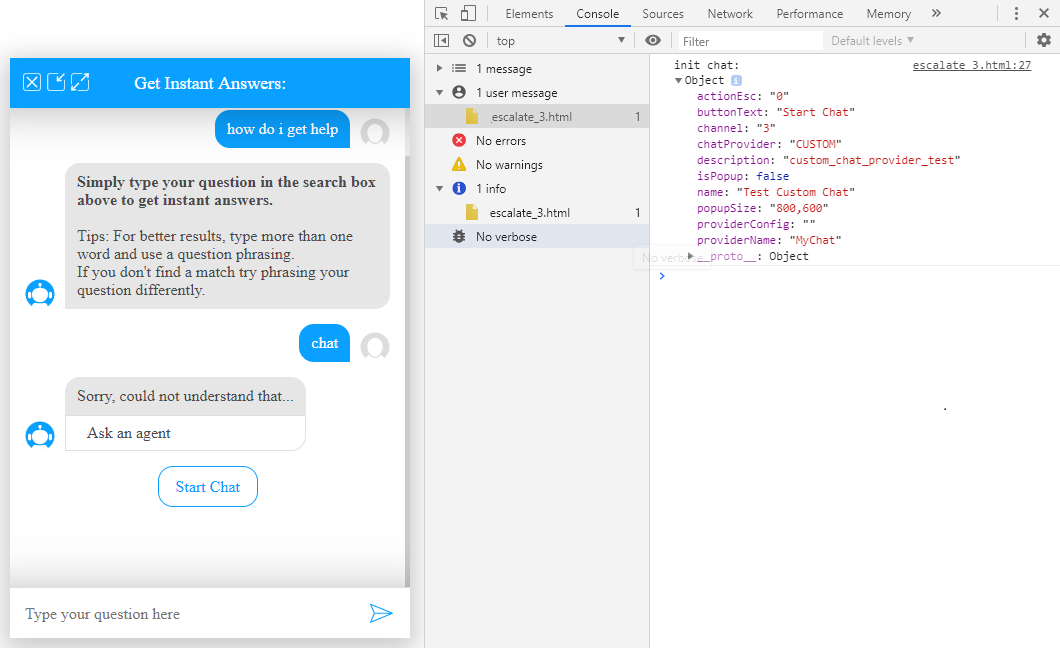
Type a query that triggers the
custom chat provider, and click the Start Chat button.
If your constructor method sends a message to the console log, you can see that message in the Developer Tools pane.
After your start the chat provider, you should see the Hello message from the requestChat method. Then, whenever you type something, you will see the agent reply message from the sendMessage method.